Soy sauce chicken
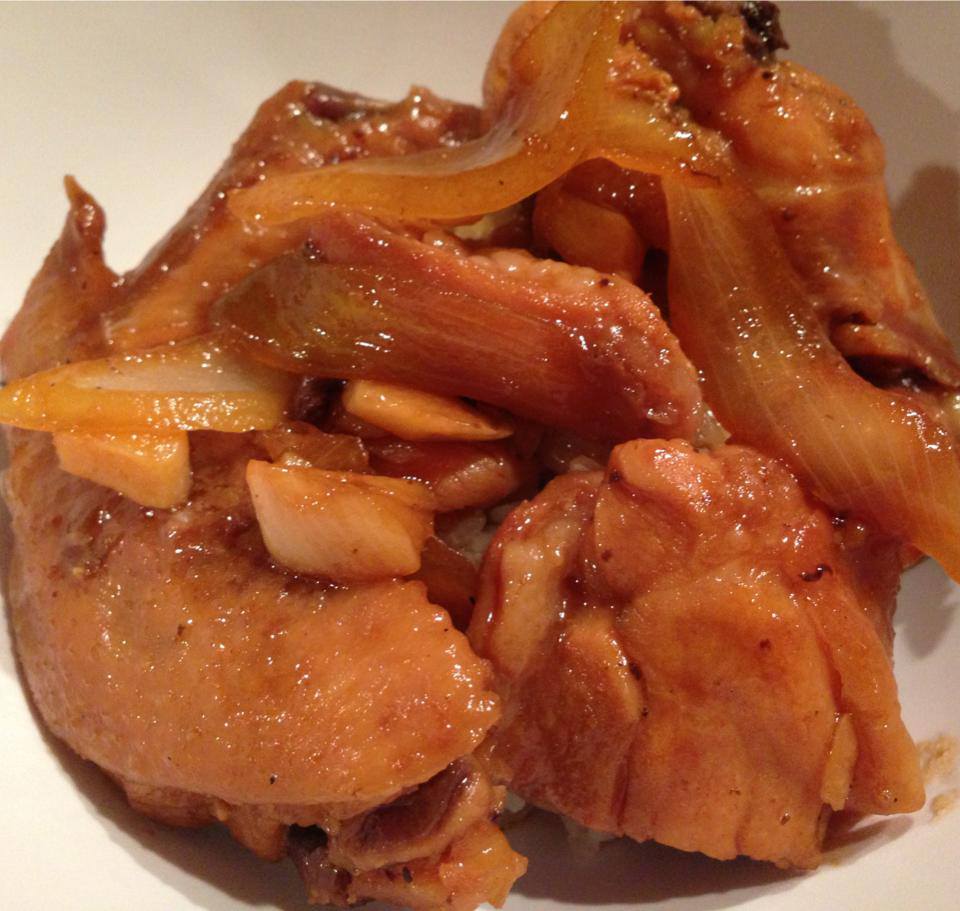
Soy Sauce Chicken
- 1 pound chicken cut up into small pieces
- 1 onion sliced into thick wedges
- 1/4 cup soy sauce (or 1/2 cup depending on the saltiness level of your brand)
- 1/2 cup rice wine vinegar
- 2 tbsp packed brown sugar
- 1/2 cup water
- 1/4 tsp black pepper
Mix everything together and place into a pan.
Heat the pan until it starts to boil, then reduce to low heat, cover with a lid, and let cook for 20 minutes.
Then turn up the heat to high and let the water evaporate until the sauce gets thicker.
Turn off the heat and serve.
You can add thai chillies or hot pepper flakes if you like it spicy.
Hmong Pork Sausage

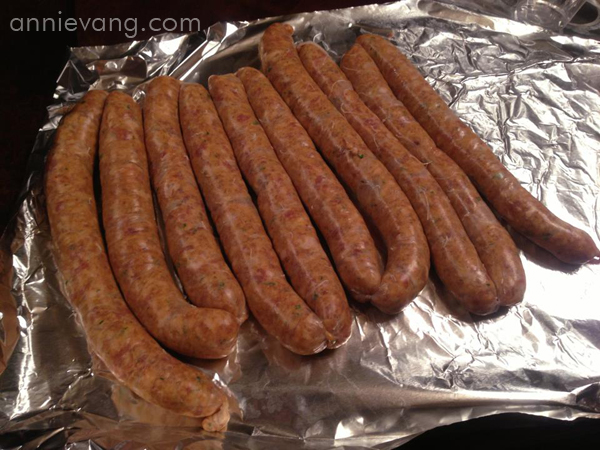
Hmong Pork Sausage, Asian Sausage
It's been a fun journey making hmong sausages over the past year. Prices have really peaked here where I usually buy hmong pork sausage. Now it's about $10 for a 2 pound pack. So I opted on my quest to make my own home made Hmong style pork sausage. I am happy to share with you what has worked for me and that I've received great feedback on my sausages. The recipe below will make about 10 pounds of pork sausage. They keep very well in the freezer, so you can keep them there for months and they will still taste great!
I also have another recipe for an herb infused hmong pork sausage. I will make a video of that one another day. For now, the one below is for the spicy hmong pork sausage. If you don't like spicy, omit the thai chilies.
Ingredients:
- 5 pounds pork belly grounded up
- 5 pounds ground pork
- 1/4 cup thai chilis minced
- 1 cup red onion minced
- 1 cup green onion minced
- 1 cup ginger minced
- 1 cup lemon grass finely minced
- 1/4 cup lime leaf minced
- 1/4 cup chili sauce in peanut oil
- 1/4 cup tapioca starch
- 1/2 cup glutinous rice flour
- 1 tbsp Morton Tender Quick
- 1 tbsp MSG (optional)
- 1 tbsp salt
- 1/2 cup fish sauce (three crabs brand)
- 1 cup water
- 1/4 cup sugar
- hog casings
- Remove the hog casings and let sit in cold water for 30 minutes.
- Rinse each hog casing with cold water until the salt is removed. May need to repeat several times. Set aside.
- Mix the water, chili sauce, and thai chilies in a small bowl.
- In a large bowl, mix all the ingredients together and pour the sauce in step 2 into the mixture.
- Stuff the sausage in the hog casings. You can use various methods to stuff your sausage. In my video below, I will demonstrate to how stuff sausage using a sausage stuffer I bought from Gander Mountain.
Tips and Advice
- Get a good quality sausage stuffer if you are going to make a lot of sausage. Doing it manually takes too long.
- I bought a Kitchenaid sausage stuffer attachment for under $20 but it took too long and my arms got sore pushing the meat into the stuffer.
- I tried doing it manually with a milk jug and 2 liter bottle. Too long.
- Do not overstuff the sausage, leave it loose so that the meat can expand and cook. If your sausage explodes, it means it was too packed too tight.
- If your sausage comes out too salty, it usually means you left a lot of salt in the hog casings and didn't rinse all the salt out.
- Morton Tender Quick salt. You can find this at most grocery stores.
- MSG is optional. It's a meat flavor enhancer, if you don't like it don't use it.
- Don't skimp on the chili sauce in peanut oil. This gives the sausage that nice flavor and color.
Asian Pork Sausage, Hmong Sausage, Lao Sausage
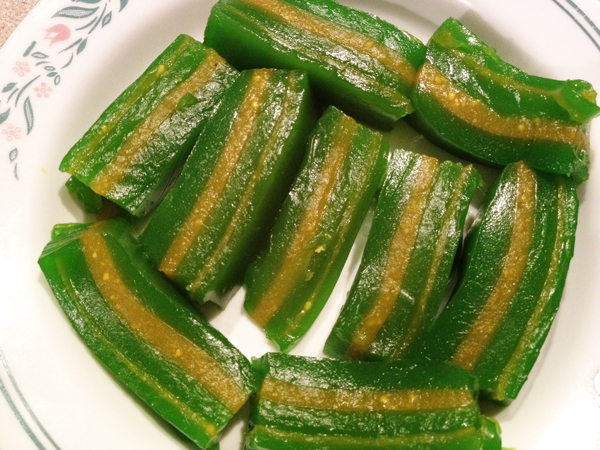
Hmong jello

Making Hmong jello is very easy. It is great for all occasions. All you need are a few ingredients! Let's get started.
Hmong Jello Ingredients:
Version 1
- 1 cup of Knox Unflavored Gelatine (if you can find the 16 oz can it will save you lots of $$)
- 1 can of coconut milk (13 oz can)
- 5 cups of hot water
- 1 and 1/2 cup of sugar
- add small amount of salt (optional)
- add drops of smell flavoring (cov tsw tsw qaab rau nabvam) OPTIONAL
- Add sugar to a large bowl.
- Measure out 5 cups of boiling water to a big bowl. (becareful cos it's hot!)
- Then add the water to dissolve the sugar.
- Add coconut milk and stir.
- Lastly, add the Knox unflavored gelatine.
- Divide the mixture into three equal parts.
- Add food coloring as you wish.
- In a large pan, pour one color mixture and place in the refrigerator until firm (usually 15 minutes, depends on the temperature of your fridge).
- When the layer is firm, add another layer.
- Once it's all solid, cut it up into smaller pieces!
VERSION 2 - this one tastes creamier!
5 cups water
1 and 1/2 cups sugar
3/4 cup unflavored gelatin
1 can of coconut milk (13 oz)
5 egg yolks
pinch of salt
Food coloring of your choice
Mix the water, coconut milk, and sugar in a bowl and heat over medium heat. Add a pinch of salt, optional.
When little bubbles start to form on the surface, add the egg yolks and stir immediately. Do not let it boil or else you will have scrambled eggs.
Sprinkle the gelatin carefully and stir so it does not get lumpy.
Remove and separate into 3 equal parts.
Add food coloring as you wish.
Pour one color in a pan and chill in the freezer or fridge until solid.
Pour next color when the layer is solid enough to hold another layer.
Continue until all colors are done.
Cut and serve!
To make egg shell mold, crack the narrow end of the egg with a toothpick or knife. Carefully remove a dime size hole. Pour out the egg whites, then the egg yolk will come out last. You can use the egg yolks for this recipe or save for another time. Rinse the egg shell in water. Place upside down back in the egg carton so the water drips out. If you are concerned about using real eggs, I suggest you can buy egg molds online or at the store. They make jello molds for eggs.
To fill the egg shells, use a plastic bag and pour it carefully into the shells. OR put the liquid into an empty plastic squeeze bottle and pour into the egg shell.
Where to find the large can of unflavored gelatin?
I bought a 16 oz can of Knox Unflavored gelatin at a large American grocery supermarket. Here in Madison, WI I bought it at Woodman's. If you cannot find the 16 oz can, you can buy the individual unflavored gelatin packages at any supermarket. It is cheaper to get the 16 oz can if you plan to make a lot of jello! You can make a few batches with the 16 oz can!
Where to find the powder food coloring like the one in the video?
I bought the Swad food coloring at my local asian grocery store. If you cannot find powder food coloring, you can use liquid food coloring too. Powder form just makes the colors brighter but any coloring would work.
I hope you enjoy this recipe. Try it with different colors and see how it turns out! Please subscribe to my youtube channel for more updates and new videos!
Khaub piaj kao piak

This soup is great to eat on cold winter days or just days when you are feeling under the weather. It can be enjoyed with various condiments such as fried garlic, chili paste, cilantro, green onion, fish sauce, etc ... Today, I will show how to make a simple rice noodle soup with chicken.
Serves 4 servings
Stock Ingredients:
- 1 cup chicken pieces (you can use whatever pieces you want)
- 5 cups water (you can add more later if you want it less thick)
- 1 stalk lemongrass (chopped into 3 pieces) - optional
- 3 chopped green onion for garnish - optional
- 1/2 tsp salt
Noodle Ingredients:
- 1 cup rice flour
- 1 cup glutinous rice flour
- 1 cup hot boiling water
- tapioca flour for dusting (keeping it from sticking)
Making the stock:


- Boil the chicken, salt, & lemonstalk in the water.
- Scoop out any foam that may be floating in the water.
- Cook for about 10-15 minutes. Cooking time will depend on how big you chopped up your chicken pieces.
- Take the chicken pieces out and shred them with a fork until you get small pieces. Set the chicken aside in a bowl.


- Boil water in a pot.
- Mix the 1 cup rice flour (red one) and the 1 cup glutinous rice flour (green one) in a large bowl.
- Add 1 cup boiling hot water slowly into the mixture and mix it together until incorporated. You will have to use your hands to knead the dough. If it is too dry, add 1 tsp water. If it gets too sticky, add a few tsp of tapioca starch (blue one).
- On a large surface, lightly flour with tapioca starch.
- With a rolling pin, flatten out the dough. Add tapioca starch so it doesn't get too sticky.
- Cut the noodle into long strings.
Putting it all together:


- Carefully place the noodles into the stock and boil for 5 minutes.
- Then add back the chicken pieces. Add more water if it gets too thick. Be careful not to stir the noodles too much or else they will break.
- Cook an additional 5 minutes. Then it's ready to serve!
- Add any condiments of your choice!

Modifications to this recipe - time saver!
- If you have a KitchenAid mixer or similar, mix the flours and water with the dough mixer.
- If you have a KitchenAid noodle cutter, use the fetticine blade to cut the dough into strips.
Hope you enjoy this recipe. Feel free to leave me any comments.
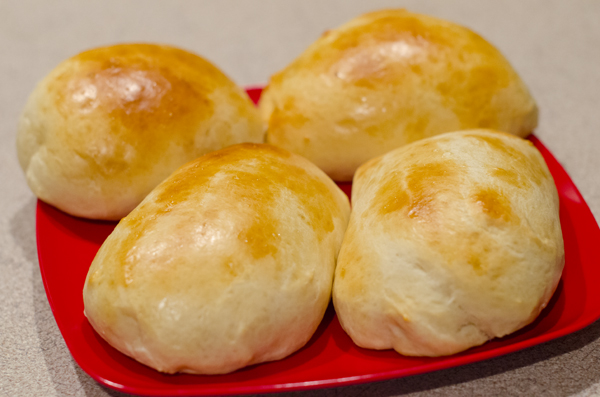
Long cheng bread


This is a delicious, warm sweet bread that is great with coffee or tea. I learned how to make this bread from my sister in law Ntxawm Cheng. Thank you Ntxawm Cheng!!!! It's a simple process. She taught me how to make a huge batch. But this version below is one that I slightly modified to make half the batch (about 30 loaves depending on how big you make them).
I don't know what the real name of this bread is. But it kind of tastes like the bread that I ate once in California, so I'm just nicknaming this that bread!
Hmong Long Cheng sweet bread
Ingredients:
- 1/2 can evaporated milk
- 1/2 can sweetened condensed milk
- 5 eggs
- 1 lb sugar (this is about 25% of a 4lb sugar bag)
- 5 packages of vanilla sugar
- 1 can coconut milk
- 1 and 1/2 can water (use the coconut milk can)
- 1 tbsp baking powder
- 5 packages instant yeast
- 5 lb bread flour (save at least 2 cups for dusting)
- 1 large rectangle aluminum pan
- 2 large aluminum baking sheets
- parchment paper
- In a really large aluminum pan, mix evaporated skim milk, condensed milk, eggs, sugar, vanilla sugar, coconut milk, water, baking powder, and yeast. You'll get a slushy consistency. I used my hands to do the mixing but if you want, you can use a whisk. By using my hands, I'm able to feel if the sugar has been dissolved.
- Add the bread flour to the mixture and continue mixing until incorporated. The mixture will resemble a really thick pancake batter and will be very sticky.
- In an oven, heat to 170 degrees. If you have a warm feature in your oven, keep it at 170 degrees. Cover the aluminum pan with foil and let the dough rise in the oven for about 1 hour.
- The dough will double its original size. Remove from oven and place the pan on a solid surface.
- Dust your hands in flour and take a baseball size piece of dough. Roll it into a hot dog bun shape and place onto the parchment paper 1 inch apart. You can also roll it into a circle if you wish. Try different shapes!
- You can use two baking sheets to cut the cooking time in half. Just remember, the bottom one will cook faster so you will have to keep an eye on it.
- Bake in oven at 350 degrees for about 30 minutes or until the bottom turns slightly brown. The top may not be brown, but as it cools it gets brown. Remove and cool on a rack.
Variations:
- Add some pandan custard to the inside when you are rolling the dough into pieces.
- You can also try taro, vanilla custard, nutella, etc ... be creative!
- You can also try to slice the top to make cool shapes like X's or other. Get creative!
Tips:
- Personally, I like my buns soft so I try not to let the bottom part brown too much. Once you take it out of the oven, it still continues to cook a little. You will notice that the top will start to brown more even after it's out of the oven.
- If you want to freeze the buns for later use, don't cook them all the way brown. Use a tong to lift up the bottom to see how solid the bun is. If it's flimsy, it's not cooked. If it's firm but not brown, remove from oven. Let it cool first before putting into a bag or freezer. If it's hot and you freeze it in a bag, condensation will build up and you will have a slimy bun hehe.
Good luck! Please leave me a comment if you have any questions. I'll be back to post more step by step pictures. A lot of people have been asking me for this recipe so I am posting it here for you to try! I love to share, so sharing it is!
Here's a video if you want to see me in action!
Tapioca layer cake steamed banh da lon
I love eating this steam tapioca layered cake dessert on as a past time snack. It's soft, chewy, and coconutty. This is also known as "banh da lon" in Vietnamese. It is also known as "kuih lapis" in Malaysia. This recipe makes 1 cake.
Tapioca Cake Ingredients:
Green papaya salad
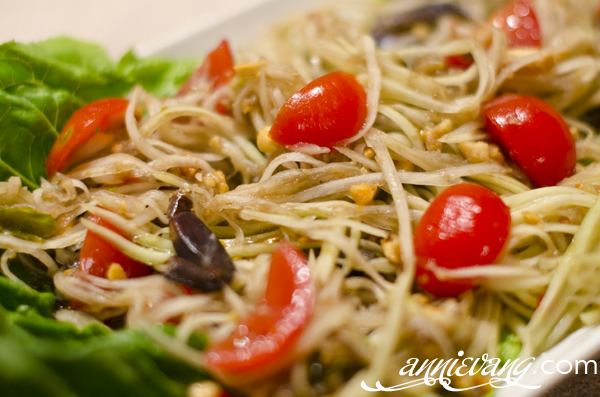
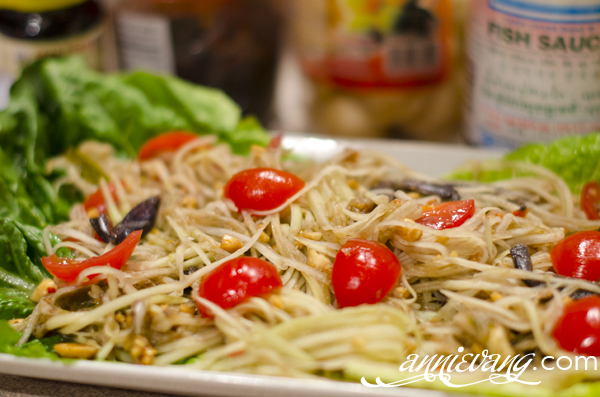
I love eating green papaya salad especially in the summer! It is light and refreshing. It's a little sweet, sour, and spicy! You can make it with a few key ingredients! This is a recipe that I created through experimentation and trial/error. Hope you like it. This is a very popular salad that Hmong people love to eat especially at Hmong soccer tournaments and Hmong New Year celebrations. Green papaya salad originated from Laos/Thailand.
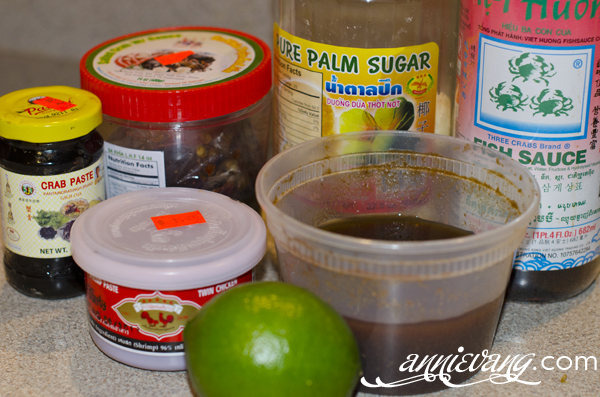
Green Papaya Salad Recipe Ingredients:
- 2 cups shredded green papaya
- 1 clove garlic
- 3 thai chili pepper (add more or less pepper to suit your taste)
- 1 tsp shrimp paste
- 1/4 tsp crab paste
- 2 tbsp salted crab
- 2 tbsp palm sugar crushed + 1 tbsp water (melt for 30 seconds in a microwave)
- 1 tbsp fish sauce (three crabs brand)
- 1/4 cup tamarind paste water
- 1/2 lime (this also equals about 1 tbsp, add more lime if you like it more sour)
- 1 1/2 tbsp crushed peanuts
- 5-7 cherry tomatoes sliced
Preparation
- Peel the green skin off the papaya with a peeler. Use the asian shredding peeler to get thin shreds. Or if you don't have one, chop the papaya all around and then use a knife to slice it into strips (doing it the old fashioned way makes the salad crisp).
- Melt the crushed palm sugar with 1 tbsp water in a microwave for 30 seconds
- To make the tamarind paste water, take a block of tamarind and add equal amount of hot water. Let is soak for about 10-15 minutes and then squeeze out the juice. You can use it just like this or put it through a sieve to remove the seeds.
Putting it all together
- In a mortar, smash/grind the thai chili pepper.
- Add the garlic clove and smash.
- Add the shrimp paste, crab paste. Mix.
- Add the salted crab and smash lightly to remove the juices from the crab.
- Add the fish sauce, sugar syrup, tamarind paste water. Mix.
- Add the tomatoes and smash lightly to bruise the tomatoes.
- Put the shredded green papaya in a large bowl.
- Add the sauce and crushed peanuts to the papaya and toss to coat the papaya.
- Serve
Adjust the ingredient measurements to suit your taste!
Kicking it up a notch:
- Add some long green beans
- Add some shredded carrots
- Add some dry small shrimp
- Add some khaub poob noodles
- Eat it with some pork rinds
- Add padek (mud fish) to give it a pungent kick
- Anything you like!!!!!
You can buy the ingredients at most asian grocery stores. Just ask the clerk to help you find them.
Leave me a comment if you try this recipe!
Chinese sponge cake

This recipe is very easy to make! I love eating these any time of the year! They are soft, moist, and delicious! Reminds me of my childhood.
Ingredients:
- 3 egg yolks
- 3 egg whites
- 1 whole egg
- 1/3 cup canola oil
- 1/2 cup sifted cake flour
- 1/4 cup fine sugar (see instructions below to make your own)
- 1/2 tsp vanilla extract (optional)
Steps
- Beat the 3 egg yolks plus 1 whole egg.
- Add the oil and beat.
- Add the cake flour and mix. Add the vanilla extract.
- In a mixer, beat the egg whites until frothy. Then add sugar.
- Continue to whisk until the egg whites form stiff peaks.
- Fold the egg whites into the batter until combined.
- Pour into paper lined cup cake pan.
- Bake in the oven at 350 degrees for 18 to 20 minutes (or until top is golden brown).
- Cool on a rack and serve!
Making your own fine sugar
- Put sugar in a food processor and process it until it is powdery soft.
- You don't want to end up with powdered sugar, but you want the consistency to be soft and fine.
Soft sweet milk bread
This bread is soft, sweet, and delicious! This bread was inspired from my experience eating soft sweet japanese bread. I used a chinese method to make the flour paste. This helps the bread be soft!
Ingredients:
- 5 cups bread flour
- 1 cup sugar
- 1 package of instant yeast
- 1 cup milk
- 1 cup water
- 1/3 cup bread flour
- 2 eggs
- 1 tsp salt
- 1 tsp vanilla extract
- 1 stick butter, softened and cut up in slices
Step 1
- Add 1 cup water and 1/3 cup of bread flour to a sauce pan. Mix on medium heat until it forms a thick paste.
- Remove and set aside to cool
Step 2
- In a mixer, mix 5 cups flour, sugar, yeast, and salt together.
- Mix wet ingredients together: 1 cup milk, 1 tsp vanilla extract, 2 eggs, the flour paste from step 1.
- Make a well in the mixer and add the wet ingredients to the dry ingredients.
- Using the bread/kneading hook, knead until smooth.
- Add the softened butter one at a time.
- Knead for 20 minutes or until the dough is elastic and smooth.
- Set in a dry place and let it rise until double in size.
Step 3
- Shape the dough into any shape you like.
- Mix 1 egg white with 2 tbsp of water.
- Brush onto the buns before baking.
- Bake for 10-13 minutes on 320 degree oven OR until the top is golden brown.
- Do not overbake, it will make your bread hard.
- Remove and let cool.
- Enjoy!
How to make beef larb the Hmong way
This is a video I recorded using my iPhone 4S. We went to a family gathering (spirit calling ceremony) for some relatives and my hubby was tasked to make some beef larb. I decided to make a video of this because some people may be interested in learning about how Hmong make their larb. My hubby is the one in the orange shirt in the video :-) This dish shown here can feed up to 100 people. Hmong family gatherings are usually very large and there is always a ton of food and goodies!
Hope you enjoy the video. If you have any questions, feel free to leave a comment below or comment on Youtube. Please subscribe to our youtube channel!